How to Start A Running Blog

The Set-up basics: Laying down the foundations
The Essential Questions
It is important to establish a clear purpose/s and goal/s for your website or blog. This will guide your focus when creating the platform and content, and allow for smoother decision making as you follow the construction process. Some questions to ask yourself are:
- What are you trying to communicate to your audience?
- What are your short and long term goals with this website?
- Why are you establishing this platform of communication to the world?
I recommend writing these down in a notebook that you dedicate to jotting down anything to do with your blog, small business website (whatever your purpose!). These can be anything from ideas for your next blog post, random late-night to-do thoughts, or miscellaneous stream of consciousness writing. Whatever, get creative.
Trello.com
This nifty ‘to-do list’ style website will help you keep track of what you need to do, what you’re working on, and what you’ve finished: https://trello.com/. The great thing about it is you can add multiple users who can also adjust the list, and see what you’re doing. Everyone’s on the same page!
Establish a domain
This is your URL to your website. In other words, your web address (like a home address). It is easy to get confused and assume this is your ‘website’. The website is the product that is created once a ‘host’ server is established (the house). URLs were created to get around the issue of IP addresses, which is an identification number that computers use to communicate with each other. These numbers are difficult to remember, so personalized URL creation was established to make this much easier.
Before you purchase a domain, you need to make sure to check if the name is available. The links inserted below will lead you to the domain purchase sites where you can also search URL name availability. Choosing a ‘.com’ URL is best in most cases, as it is easy to remember and the most widely used URL style.
 I also recommend choosing HTTPS secured links, as these sites are more trusted by Google, and therefore rank better.
If you’re running a business from this site, clients are more likely to feel safer purchasing off an HTTPS secure site. See the links below are, ‘https’ before the ‘www.’ This is what I am referring to:
I highly recommend WordPress. Statistics show that it “powers over 30% of the entire internet”, (for an interesting read see: Venturebeat.com). WordPress is great because of its variety of options, versatility, and user-friendliness.
Popular domain establishment sites + cost breakdown:
- Namecheap
- Around $8.88 a year for a ‘.com’ link. This is a very simple, cheap option and seems to work well. Unlike Wix, discussed below, it is just for the purpose of establishing a domain.
- Wix
- Wix is slightly different, as it allows you to purchase a domain, web hosting and website building software all in the same package. You can choose this option which consolidates the number of websites and platforms you use to help create your own website. However, I have found that using a specific website link ‘Namecheap’ to purchase a domain, a separate hosting server like ‘host-gator’ and a specific website builder like ‘WordPress’ just as effective. If not more!
- Wix has multiple different plans, which it advertises as ‘per month cost’. Select the one that best suits your needs (referring back to the purpose of the site in section 1 of this post). From a personal standpoint, I’d recommend the ‘Unlimited’ plan, as it has lots of options. The simple ‘Connect Domain’ plan is very limited and can be frustrating in this sense.
- Godaddy – https://www.godaddy.com/domains/domain-name-search?isc=gofd2001aj
- Similar to Namecheap, you can purchase domains quite cheaply on Godaddy. I tested out a domain I’m interested in which ends in ‘.com’. It offered me $0.99 for the first year, and around $17.99-19.99 every year after that. However, if you buy multiple years in one package, it is often more economical.
You’ll need a hosting server
Websites need to be stored on a server, as we mentioned above. This is essentially ‘the house’ to your address (URL). A web hosting service provides the user with the services required for the website to be viewed on the internet. For example, when you search for a website in a browser, the browser connects you to the server and the web page is then delivered to you through the browser. So, a browser is just a gateway between the server and your web page.
I like to use Hostgator. It is cheap, links with WordPress (a great site builder) and has awesome customer service.
- Host Gator – www.hostgator.com
- Host gator has 3 plans, as shown in the link above. I recommend a Hatchling Plan if you are just starting out, and only planning on establishing 1 domain. This is $2.75/month. However, if you plan on owning multiple domains in the future, the Baby or Business plan would suit your needs better.
Install self-hosted WordPress via QuickInstall
- Log in to your cPanel on www.hostgator.com (the server hosting site discussed above)
- Hit the menu page labeled Software, and then click ‘QuickInstall’
- Under ‘Website Essentials’, hit ‘One-Click Installs’
- Then select the WordPress icon on the next page.
- Select which domain you’d like to have WordPress installed in to.
- Complete the form that will appear
- Congratulations, you just need to check your emails for your WordPress login credentials and a link to your WordPress admin page, and you can begin building from there!
For a more comprehensive explanation, visit this website:
https://www.hostgator.com/help/article/how-to-install-wordpress
Designing your website
It’s highly recommend that you use WordPress. Statistics show that it “powers over 30% of the entire internet”, (for an interesting read see: https://venturebeat.com/2018/03/05/wordpress-now-powers-30-of-websites/). WordPress is great because of its variety of options, versatility, and user-friendliness.

Getting started with WordPress
To begin, pick a minimalist theme/suited to the aims of your website. Why minimalist? It draws attention to what is important in your website, which is the content.
-
- Under the ‘appearance’ menu hit ‘themes’
- Selecting one of these themes establishes how your website will look to the audience. Different themes allow for different customization options and enhance certain features. For blogs, we generally recommend something that is simple: it draws the readers attention to your post, not clogged up side content.
- Pick a font, generally speaking, one with the word ‘Sans’ in it works best
- You could use ‘Open Sans’ font
- To choose from a variety of fonts, visit https://fonts.google.com/. Here you can download fonts in a zip file, and use them in wordpress when writing content.
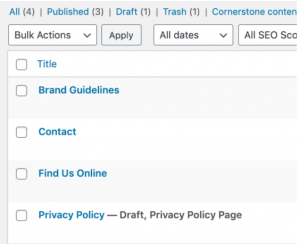
- Set up your pages → under ‘pages’ menu in WordPress
- Homepage (seen by the audience)
- Content/posts page (seen)
- Contact (seen)
- Find us online (hidden, this is purely for link building)
- Brand Guidelines
- (hidden, this is where you record the details of your site building you might forget, such as your chosen font, color palette codes, etc)
Widgets
- (WordPress admin → Appearance → Widgets)
- Widgets are small blocks that have particular functions that you can add to your website. It affects the design and aesthetic layout of your site.
- Some of the key widgets I have chosen to use are:
- Archives (monthly archive of site’s posts)
- Navigation Menu (to display different pages on your site)
- Recent Comments (displaying comments on your posts)
- Recent Posts (most recent posts)
Plugins
Plugins are how we add extra features to a website. They enhance the user experience of the website. Some of these will run in the background, whilst others are interactive and customizable. This is a good order to install the basic plugins to begin with, for ease of use:
- Classic editor → enables the WordPress classic editor, old-style edit post screen. Supports older plugins
- Really Simple SSL → SSL(Secure Sockets Layer), ensures the security of your website
- Yoast SEO → an SEO solution for WordPress. SEO stands for Search Engine Optimization and works effectively with the Google algorithms.This runs in the background and enhances your site. Some of the features include:
- Keyword and synonym optimization
- Readability analysis → reading-ease score
- Image optimization → helps you rank images
- Insert headers and footers → to insert code or text into the header and footer of your website pages, for softwares to track and gather data, such as Google Analytics
- Popup Maker → create popups, easily edit their theme, design, size. You name it!
Gravity Forms Plugin
Sadly the Gravity forms software does have a cost to install and utilize as a feature, but it is well worth it, and a small investment for long term gain. This feature costs $59 and can be added directly to WordPress via the plugin installation. – https://www.gravityforms.com. It allows you to:
- Easily create web forms and manage form entries within the WordPress admin. This is important if you want to establish a Newsletter or Contact Us page, which is highly recommended for any website type.
- Install the Gravity Forms Plugin, hit activate, and enter the support license key you received upon downloading the software via the Gravity Forms website.
Your Analytical Toolbox (how we gather data to enhance your website)
This section will teach you how to set up the essential software you need to gather data and analytics, optimize your experience as a website owner, and better the audience’s experience of your platform. This covers what you should begin with, and what you should set up soon after you’ve got the hang of things.

Keywords Everywhere chrome extension
https://keywordseverywhere.com/
When I mention ‘Keywords’, this is what I am referring to. Keywordseverywhere is a browser add-on (or extension) that has a free or premium version. The premium version after a few months of establishing and getting the hang of your website is optimal. For now, install the free version. Here you will be able to see the related keywords to your google searches, and what other people are searching related to those keywords.
The premium version is fantastic, as you can see “monthly search volume, cost per click and competition data for keywords on multiple websites like Google Analytics, Google Search Console etc.”
It’s a good idea to target your blog posts and content around keywords which are not overly used and could rank well on Google with some smart post writing, promotion on various social media and link building methods.
Set-up Google Search Console
The Google Search Console (GSC) will be one of your foundational go-to tools for reports on analytics regarding the performance of your organic-search traffic in google. GSC assists in establishing that your site exists with Google. It makes your site searchable and builds trust with Google.
It also provides you with valuable analytics for your website. For example, the number of times your site links have been clicked via a google search engine result (known as an impression, which will discuss a bit later). It also reports on:
- Post-click data regarding engagement with the content in your site such as:
- E-commerce conversion rates
- Performance of an individual blog post (via the posts unique link)
- Bounce rate (the number of people who visit a website and navigate away after only viewing a single page)
Steps:
- Install Search Console: https://search.google.com/.
- Add your website and verify it with Search Console. To do this, select the ‘property dropdown in Search Console’. Next, hit ‘+ Add Property’ on the dropdown. Add the property under the specific category.
- You’ll be asked to verify the domain or URL’s added to the Console. You can verify it immediately or do this later.
- Once you verify, it is important to enable GSC data sharing → click ‘Admin’ and then ‘property in which you want to enable Search Console data sharing’.
- Hit ‘Property’, then ‘Property Settings’. Scroll down to Search Console Settings, and you should see the URL/s that you have added. This confirms that your website has been verified in GSC and you now have permission to make changes.
- Select the ‘Reporting view’ for the URL you want to see the GSC data.
Note: GSC keeps data for at least 16 months.
Set-up Google Analytics
Google Analytics allows you to collect simple data about your website.
Steps:
- Install Google Analytics and create an account: https://analytics.google.com/analytics/web/
- Set up a property (your website) in your Analytics account. To do this, hit ‘Admin’, then hit the ‘Account’ column. Select the account to which you want to add the website/URL.
- In the ‘Property’ column, click ‘+Create Property’ → hit ‘Web’, and enter a name for the property
- Enter the website URL, and make sure to select the protocol (this should be ‘https’ which we looked at earlier in the post). Also, enter the simple domain name eg. www.website.com
- Select your industry category, and reporting time zone.
- Hit ‘Create’, and accept the terms of service. Then hit ‘Finish’.
Next, we have to ‘Add a new view’ for the property (your website).
- Sign in, hit ‘Admin’ and then select the page titled ‘account and property to which you want to add the view’.
- Under the ‘View’ column, click the menu, then hit ‘+Create View’
- Hit ‘Website view’ for the online copy of analytics, or ‘Mobile app’ for a mobile analytics view. They are slightly different from an analytical standpoint.
- Enter a Name for the data, select your time zone.
- Hit ‘Create View’.
Note: if your analytics account is going to be linked to a Google Ads account, data from Google Ads will be automatically imported to any ‘New View’ you create in Analytics.
Learn and become familiar with the meanings of the data segments in Google Analytics. Visit: https://support.google.com/analytics/answer/3123951
Find your Google Analytics ID to add a tracking code to your website
- Sign in to your Analytics account
- Hit Admin, then select your desired account from ‘Account’ column
- Select a ‘Property’ (your website) from the ‘Property’ column
- Under Property, click tracking info → tracking code. The ‘Tracking ID’ will be displayed at the top of the page.
Now that you have your ID, you’ll want to add it to your site. I recommend installing the ‘Headers and Footers’ Plugin to your site, so you can copy and paste this information onto your pages. See the screenshot below from https://support.google.com/analytics/answer/1008080

Tip: Be sure to install the Google Analytics App, so you can gather data from your device! Global Site Tags allow for on-demand data tracking via google analytics for each page of your website.
The Google Marketing Platform
It’ll be useful to make an account on the Google Marketing platform to manage your Google Ads accounts and to install these other software products for your website. Similarly, you’ll have to paste a bit of code like the one above into the header or footer of your website pages you wish to have the software chosen active on.
I recommend installing:
- Google Optimize → this allows you to create the best possible version of your website, in an everchanging online environment and the outside world. For example, you can create variants of your webpage and content (or experiments) and test them against other variables to see how they would perform before your release the content.
- Google Tag Manager → Free tag management. This allows you to manage and utilize marketing tags (code snippets) on your website. From there, you can track multiple features of your website such as conversions and analytics.
- Data studio (data reporting)→ to generate data reports of analytics to make smarter business decisions
https://marketingplatform.google.com/about/
Writing your first blog post
Keyword Targeted Post Writing
- Use it as a means to write about what you actually want to write about
- Answer the question, and segue into the similar topic….
- Remember, posts with more writing content generally do better overall! At least 1000 words is key.
Always begin with a photo that is relatable to the audience and post

- Humans love visual content, our brains respond to it easily. Draw your audience in with a lovely, high-quality photo before your first paragraph of text begins.
- Of course, this should relate to the content discussed, and if possible, include a human body part in it. Why? Our brains are hardwired to respond to visuals first, it is our first true connection to the outside world when we are born. As a baby, we’d seek out faces we recognize, and associate them with comfort (subconsciously). Further, visual input sparks emotion. Emotion is key to igniting a response from the potential audience.
- Label the image description and title the keyword of your post. For example, if you are writing about ‘5K Meal Plan’, the first image would be called ‘5K meal plan 1’, and so on.
- Trickle images throughout the post. I’d say around 2 for a post around 1000 words.
Getting your website out there

We like to take a multi-faceted approach, which means to expose the content of the website to many different marketing platforms. Think visual content sites like Pinterest, interactive blog platforms such as Tumblr, popular forums platforms like Quora, and the usual suspects Instagram and Facebook. Here, we engage with users who are interested in the content you are writing about, or products you are selling. The multi-faceted approach establishes the foundations to achieve the best possible number of impressions for your content (the number of people who are exposed to your content, whether they choose to engage with it or not). Likely, some of these users will engage with your post (your ‘Reach’). This is your audience, from whom we gather data to further refine the marketing and exposure process.
Sound complicated? It’ll get easier as we go. Trust me!
Link Building
Link building involves answering questions regarding your topic and specifically, the keyword/s of your post on popular forums (like Quora). For example, I searched for people asking questions surrounding ‘Best 5K running shoes’ on Google. I answered questions in a popular running forum called ‘Let’s Run’, ensuring I added my link to the bottom of the post, directing the readers to my website. With Quora, it is the exact same process. I highly recommend reading these great in-depth articles surrounding Quora Back-Links and Types of Backlinks to build your knowledge in this area. It is a really effective way to build the popularity of your website and, eventually, make the front page of Google search results.
Types of Backlinks: Backlink Matrix and Backlink Portfolio
https://codyschneider.com/types-of-backlinks/
How to Build Quora Backlinks That Get Indexed
https://codyschneider.com/quora-backlinks/
A quick tip with Quora, be careful of posting your link too many times, as Quora admin may remove your posts. Just answer a few specific questions targeted to your keyword in focus.
To begin, create an account on Pinterest: https://www.pinterest.com.
Canva → https://www.canva.com/.
-
-
- This is where you create your pins for Pinterest.
- Keep it simple and neat, with a key image (the one you used on your post).
- For example, I used a simple theme, and selected my color from my color scheme on Coolors.co. See below
-
Coolors.co
Color palette selection platform → establishes your websites color scheme. Record the codes (for example, #F303BA) somewhere same, such as your Brand Guidelines page you have/will create (WordPress admin → pages)
Here’s my example:

- Head Back to Pinterest.
- Hit your user icon and the ‘+’ to ‘Create Pin’. Add the pin image you created on Canva. In the description add the keywords associated with your post.
- Remember to include your URL link to your post.
- Congratulations, you’ve created your first blog post associated pin.

Tumblr
Tumblr is a cross between a social networking site and a blog. Creating a Tumblr account will be purely for the purpose of increasing exposure of your website on the internet to a greater audience. You can copy the individual links of your posts to your ‘Find me online’ page on WordPress, and then index them (see Link Building).
To begin, create an account on https://www.tumblr.com/. Just like we did on WordPress, select a theme, a font, and post your content from WordPress on Tumblr as well. We should treat it like a system. What goes up on WordPress as a content post, should also be made into a pin on Pinterest, a Text AND link post on Tumblr, and so on. Always remember to utilize the keywords of your post, and link back to your site. On your dashboard you’ll have these options available to create targeted posts:

Facebook ads/Instagram ads
Running facebook ads is an essential part of advertising a business or product. According to the Pew Research Center, 70% of Facebook users in the U.S log into Facebook on a daily basis. From this statistic we can conclude that there is large market exposure potential on this platform. The great thing about Facebook ads is it is extremely easy to ‘target’ the users you want to market to, and it runs your ads on Instagram as well.
The targeting features facebook offers are:
- Audience targeting, with customizable features
- Location
- Gender
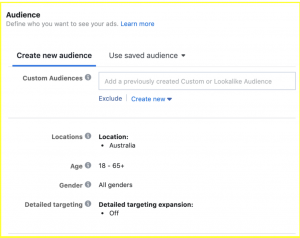
- Interests → keywords can be used here!
- People with connections to your app, page or event
- Language
- Behaviours → people who have visited your website or interacted with your content
You also need to select your budget and duration of the promotion.
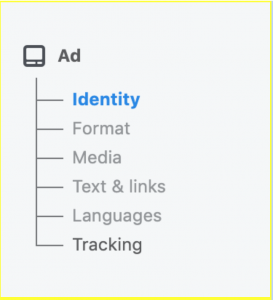
Next, you’ll be guided to design the look of your ad, with the features shown in the screenshot below available to you.
Facebook ad budget
It’s a great idea to create a budget spreadsheet on google sheets to manage your costs for 12 months. Pick a budget that you can sustain for 12 months, and work with this.
Here is a template for $150 a month to get your started. This is quite a low budget if you are wanting to monetize the blog or small business website in any form. However, we have to start somewhere! This template is customizable to your needs.
Your Newsletter – Connecting with your audience
Mailchimp
Mailchimp allows you to create newsletters, ads, landing pages, and CRM tools.
- You can create your first Newsletter on Mailchimp about your blog post, and target subscribers who register via a popup form they receive when they visit your website.
- Below will show you how to create a popup and link subscribers from your WordPress site to Mailchimp.
Zapier → Connecting Gravity Forms, WordPress and Mailchimp
Create an account on www.zapier.com, the workflow management website now, to make your life easier later.
Once you’ve made an account, create your first Zap.
- Choose Gravity forms under ‘App’
- The ‘trigger event’ should be ‘New Form Submission’
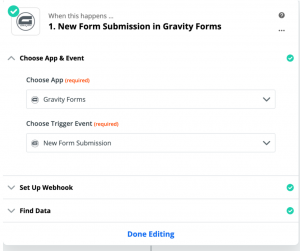
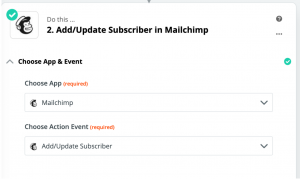
3. Next, in section 2. Select Mailchimp, and under ‘Choose Action Event’, select ‘Add/Update subscriber’. See below:
4. Congratulations! You’ve created your first Zap, and now your newsletter subscriber form submissions from your website will be directly linked to Mailchimp.
5. Head over to WordPress and add a new Plugin. It is called the Gravity Forms Zapier add-on → for the smooth integration of Gravity forms and Zapier, so your newsletter list subscribers are automatically sent to your configured zaps!
6. Under the forms tab in your WordPress Admin menu, hit forms, and select the ‘Newsletter’ form you have created.
7. Under Settings on the ‘Newsletter’ form editing page, you’ll see a new column labeled ‘Zapier’. This confirms the connection is established.
Let me know if you start the process of creating your own website! I’d love to hear about it. Still got questions? Comment below or you can visit the ‘Contact’ page above.
When I initially left a comment I appear to have clicked the -Notify me when new comments are added- checkbox and from now
on each time a comment is added I recieve 4 emails with the exact same comment.
Is there a way you can remove me from that service?
Appreciate it!
Hello! I’ll look into it for you. Sorry that happened.
Best view you can see is near Lakes !
Spot on with this write-up, I honestly believe this amazing site needs a great deal more attention. I’ll probably be back again to read more, thanks for the info!
Good post. I am dealing with a few of these issues as well..
“Great article and right to the point. I don’t know if this is in fact the best place to ask but do you folks have any thoughts on where to get some professional writers? Thank you ??”
Best air max , you will finde ever !
I can take you to spots unknown . On the Columbus
side and phenix city side. Hmu.
Very good post. I am dealing with some of these issues as well..
Love to spend time near Sea !
Thank you water that means a lot to me have
a great week.
I did have that thought too! Am out of town now for a couple of
weeks, will attempt to try this when I’m back.
I have read so many articles or reviews regarding the blogger lovers however this paragraph is truly a nice article, keep it up.
Like!! I blog frequently and I really thank you for your content. The article has truly peaked my interest.
I was able to find good information from your articles.
very nice track!
Thank you so much for watching
If you have any contacts in northern Mich. (The UP) and could do some
checking you may find it interesting, as quiet a few finish folks settled there.
BTW folks from there are known as “Yoopers” Oops, In the US!
Hi Jemmy no ive lived in England all my life 🙂 xx
This project has great upside potential due to its first mover advantage in a very strategic location.
“Saved as a favorite, I like your site!”
Also visit my web blog: ebook
Hi there would you mind letting me know which
web host you’re working with? I’ve loaded your blog in 3 completely different browsers and I must say this blog loads a
lot quicker then most. Can you suggest a good internet hosting provider at a fair price?
Thanks a lot, I appreciate it!
Very good info. Lucky me I found your site by accident (stumbleupon).
I have saved as a favorite for later!
Fine way of explaining, and fastidious post to obtain facts concerning my presentation subject matter, which i am going to convey in university.
Very good info. Lucky me I ran across your blog by accident (stumbleupon).
I have book-marked it for later!
I have read so many articles or reviews regarding the blogger
lovers but this paragraph is genuinely a pleasant paragraph, keep it up.
Hi my loved one! I want to say that this article is amazing,
great written and come with almost all important infos.
I’d like to see more posts like this .
Hi – I use wordpress to build the site and Hostgator as my server.
Have you ever considered publishing an ebook or guest authoring on other
blogs? I have a blog based on the same topics you discuss and would really like to have you share some stories/information. I
know my visitors would enjoy your work.
If you are even remotely interested, feel free to send me an email.
adreamoftrains best web hosting 2020
Wow, awesome blog layout! How long have you been blogging for?
you made blogging look easy. The overall look of your website is fantastic,
as well as the content! adreamoftrains web hosting providers
Hi Louisa,
I’ve been blogging now since March 2020. Thank you so much, that’s a big compliment!
Hi Angeles,
No I haven’t, but I definitely would love to do this if provided with the opportunity. Let’s collaborate. My best email to reach me on is larachamilton7@gmail.com. Let me know your thoughts in an email.
Thanks so much,
Lara Hamilton
Appreciate this post. Will try it out.
A person necessarily help to make critically posts I might state.
This is the very first time I frequented your website
page and so far? I surprised with the analysis you made to create this actual post extraordinary.
Wonderful process!
Thanks for your personal marvelous posting! I truly
enjoyed reading it, you may be a great author.I will be sure to bookmark your blog
and will come back later in life. I want to encourage
continue your great work, have a nice day!
My brother suggested I might like this blog.
He was entirely right. This post actually made my day.
You cann’t imagine simply how much time I had spent for this information! Thanks!
Nice blog here! Also your site loads up fast!
What host are you using? Can I get your affiliate link to your host?
I wish my web site loaded up as quickly as yours lol Bpg slot สมัครสมาชิก
I like the valuable information you provide in your articles.
I will bookmark your weblog and check again here regularly.
I’m quite sure I’ll learn a lot of new stuff right
here! Good luck for the next!
May I just say what a comfort to uncover an individual who actually understands what they’re discussing on the net.
You certainly know how to bring an issue to light and make it important.
More people really need to check this out and understand this side of the story.
I can’t believe you’re not more popular given that you certainly have
the gift.